Data collection
The first step to start the machine learning application journey is to obtain the data from sensors. To do so, it is recommended to collect the data from the same hardware that is planned to run the inference engine. This is to avoid any discrepancy between the data used to train the model and the one to run the inference engine.
Because the training is not performed in an embedded system, Imagimob Capture Server setup is used to upload the data to a computer. The mtb-example-ml-imagimob-data-collection (opens in a new tab) code example supports data collection of both IMU and PDM data and streams the data using UART.
When collecting data, it is recommended to capture data from multiple different users to train a robust model.
Data collection with PSoC™
The mtb-example-ml-imagimob-data-collection (opens in a new tab) code example supports data collection of both IMU and PDM data and streams the data using UART. This code example supports using the Imagimob Capture Server for data collection. See the README.md (opens in a new tab) file from the code example to download, configure the example, and program the device.
Imagimob Capture Server setup
The Imagimob Capture Server is a collection of python scripts thatsimplifies the integration of sensor data with IMAGIMOB Studio. The Imagimob Capture Server includes many example scripts to collect sensor data over different transmission protocols including Bluetooth® Low Energy, UART, USB, and TCP.
To install the Imagimob Capture Server run the following commands from the command prompt:
git clone git@bitbucket.org:imagimob/captureserver.git
cd captureserver
python setup.py install
The setup.py script downloads the Python modules listed in the table below:
| Python module | Version | Description |
|---|---|---|
| Bleak | 0.20.2 | GATT client software for Bluetooth® LE connection |
| Keyboard | 0.13.4 | Capture keyboard inputs |
| Numpy | 1.18.2 | Data analysis and computing |
| Opencv-python | 4.4.0 | Capture video |
| Pandas | 2.0.3 | Data analysis and manipulation tool |
| PySerial | 3.5 | Python serial port library |
| Wave | 0.0.2 | Wav file manipulation |
The Imagimob Capture Server is now setup and ready to use.
Imagimob Capture Server data collection
The Imagimob Capture Server supports collecting data over different communication protocols, as the data collection code example supports UART, the generic_local_capture_interface.py is used to capture and format data.
Change to the following directory (Imagimob Capture Server cloned repo)/captureserver/examples/generic. The script supports many different configurations, for more information see the README (opens in a new tab) file.
The Imagimob Capture Server commands are listed in the table below:
| Command | Description | IMU | PDM |
|---|---|---|---|
| --data-filename | Specify the file name for the collected sample | accel | pdm |
| --output-dir | Specify the directory to store the data | data | data |
| --protocol | Specify the protocol for data transmission | serial | serial |
| --COM-port | COM port used by the device | *Device dependent | *Device dependent |
| --baudrate | Select connection baud rate. PDM collection requires a higher baud rate for the 16 kHz sample rate | 115200 | 921600 |
| --data-format | Select output file format as .data or .wav | Default (.data) | .wav |
| --data-type | Select sample data type | f - float | h - short |
| --samples-per-packet | Specify the number of samples sent in a packet. IMU sends one sample of x, y, z acceleration data. PDM sends packets of 1024 samples at a time. | 3 | 1024 |
| --features | Select number of features/channels or types of data. IMU has three features, x, y, z acceleration data. PDM is dual channel, one feature per channel. | 3 | 2 |
| --sample-rate | The number of samples to attempt to collect per second | Default (50) | 16000 |
| --video-disabled | Disables collecting video while recording (required for PDM data collection) | Not Used (Can be used if video is not required) | Video Disabled |
The video feed must be disabled for PDM data collection to increase data speeds.
Code example is configured for IMU data collection
Once the code example is configured for IMU data collection and the device is programmed and connected to the PC, run the following command after changing the ‘xxx’ to the COM port used by the developer kit.
python generic_local_capture_interface.py --data-filename accel --output-dir data --protocol serial --COM-port COMxxx --baudrate 115200 --data-type f --samples-per-packet 3 --features 3
The script will start the video feed, this may take up to 10 seconds. The collected video can be used in IMAGIMOB Studio for reference while labeling. The commands listed in the table below are available to start recording, stop recording, and to quit the capture server. Press USER BTN1 on the kit after the server is started to trigger the device to start transmitting data. This is done to sync the capture server. Each time the server is run, reset the kit and press 'USER BTN1”.
| Command | Description |
|---|---|
| r | Start recording data |
| s | Stop active recording |
| q | Quit the data capture server |
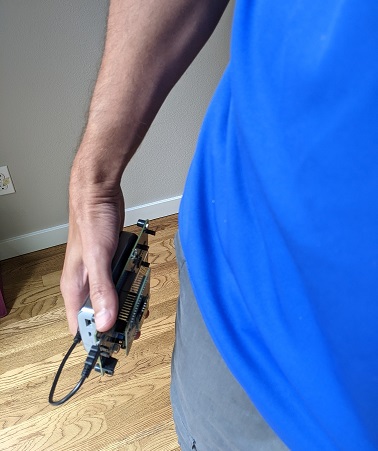
Press ‘r’ and complete one of the various activities sitting, standing, walking, running, or jumping and press ‘s’ once the action is complete. Pressing ‘r’, completing an activity, then pressing ‘s’ can be repeated multiple times and will results in multiple files (the user button on the kit only needs to be pressed before selecting ‘r’ for the first time). For proper collection, the sensor on the board must be oriented in the same general manner as the rest of the training data. The orientation for sitting and standing are pictured in the following figures. For walking, running, and jumping the board is held the same as orientation as standing with the normal arm movements associated with the respective activity.
For sitting, the board should be upside down with the KitProg USB port facing forward.
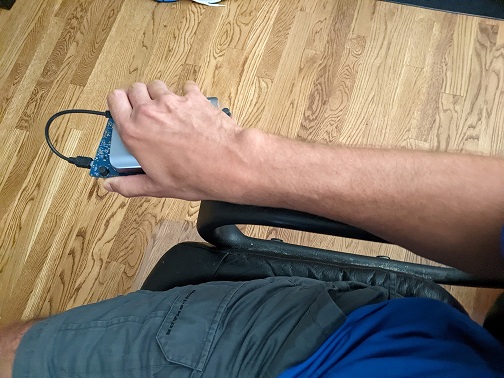
For standing, the shield should be facing toward the body with the KitProg USB toward the top of the board.
When the required data collection is completed, press ‘q’ to quit the capture server. If the server is restarted, the kit should be reset, and the user button pressed after the server is restarted. All collected data will be found in the directory (Imagimob Capture Server cloned repo)/captureserver/examples/generic/data. The output files will include label.label, accel.raw, video.mp4, and accel_parsed.data. These files will be imported into IMAGIMOB Studio.
Code example is configured for PDM data collection
Once the code example is configured for PDM data collection and the device is programmed and connected to the PC, run the following command after changing the ‘xxx’ to the COM port used by the developer kit.
python generic_local_capture_interface.py --data-filename pdm --output-dir data --protocol serial --COM-port COMxxx --baudrate 1000000 --data-format .wav --data-type h --samples-per-packet 1024 --features 1 --sample-rate 16000 --video-disabled
Press USER BTN1 on the kit after the server is started to trigger the device to start transmitting data. This is done to sync the capture server. Each time the server is run, reset the kit and press 'USER BTN1”.
The commands in the table below are available to start recording, stop recording, and to quit the capture server.
| Command | Description |
|---|---|
| r | Start recording data |
| s | Stop active recording |
| q | Quit the data capture server |
Press ‘r’ and play baby crying sounds near the sensor shield, press ‘s’ to stop data collection. Pressing ‘r’, collecting data, then pressing ‘s’ can be repeated multiple times and will results in multiple data files (the user button on the kit only needs to be pressed before selecting ‘r’ for the first time). When the required data collection is completed, press ‘q’ to quit the capture server. If the server is restarted, the kit should be reset, and the user button pressed after the server is restarted. All collected data will be found in the directory (Imagimob Capture Server cloned repo)/captureserver/examples/generic/data. The output files will include label.label, pdm.raw, and pdm_parsed.wav. These files will be used IMAGIMOB Studio.
IMAGIMOB Studio data import
IMAGIMOB Studio allows for easy importing of new data into a project. At this point a workspace and project should be created, if this has not been done see Imagimob project creation. To add data to a starter project, either the Human Activity Recognition or Baby Crying Detection starter project should be used.
The table lists the supported file types in IMAGIMOB Studio:
| Data type | File type |
|---|---|
| Audio | .wav |
| Data | .csv, .data |
| Video | .mp4 |
To import data:
-
Copy the collected data from (Imagimob Capture Server cloned repo)/captureserver/examples/generic/data to the Data folder in the starter project.
-
Open the project file (.improj) present in the project folder.

-
In the Data tab, click Add Data button.
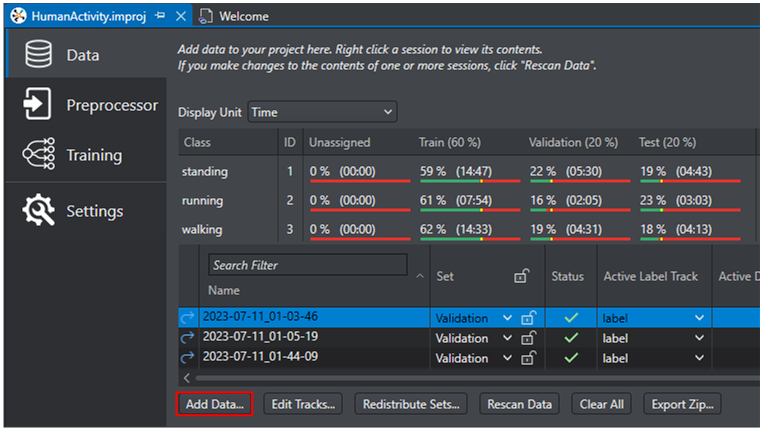
-
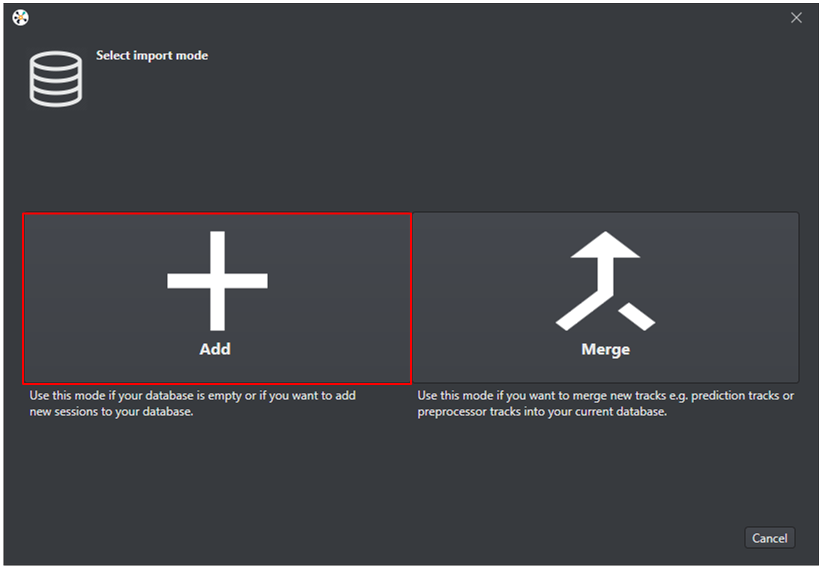
Once the Select import mode window appears, select the Add icon.
-
Select the Data folder in the current working project as the source for data.
-
If importing data from the capture server, select the Nested structure and click Next.
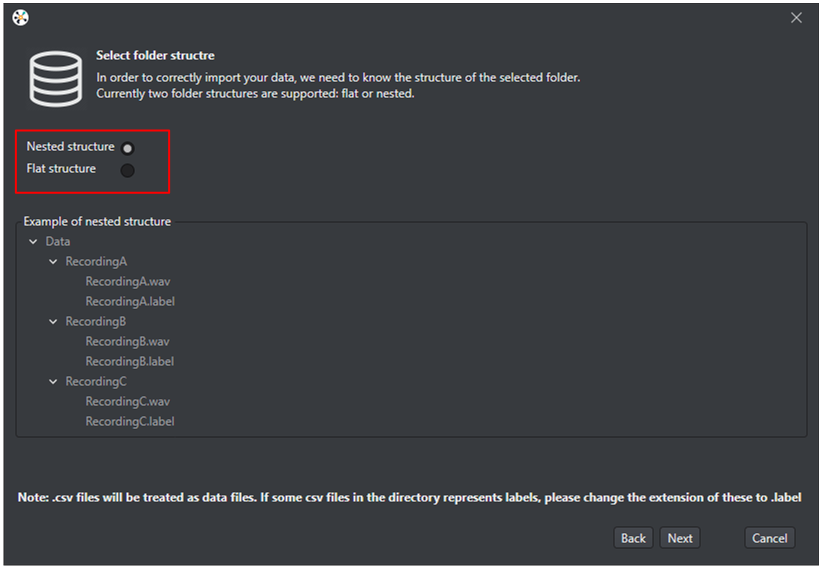
-
The data import tool searches through the folders and recognizes any folders containing .data, .label, or .mp4 files.
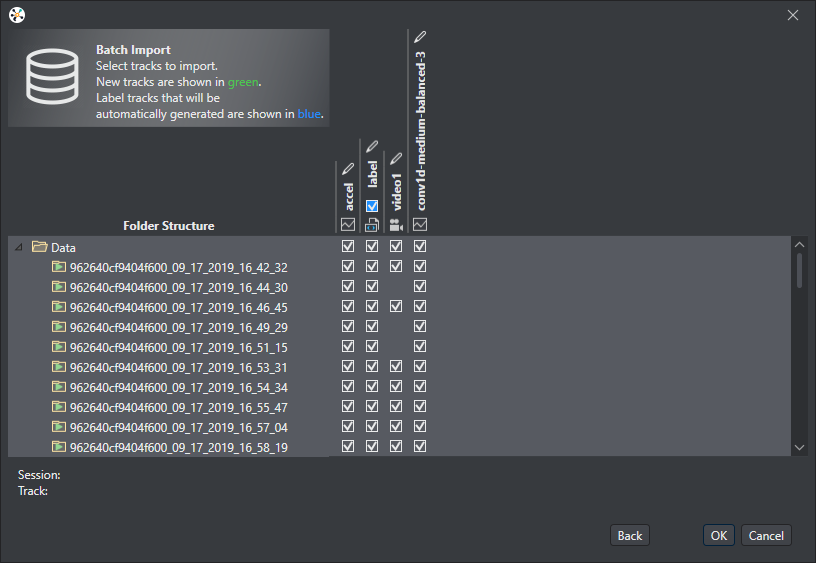
When importing from the capture server, the following files are imported, label.label, imu_parsed.data or pdm_parsed.wav, and imu.raw or pdm.raw. The .raw files should not be included in the import, they are called imu and pdm in the importer. Simply deselect the imu and pdm file. Select or deselect what files should be imported into the project and select OK.
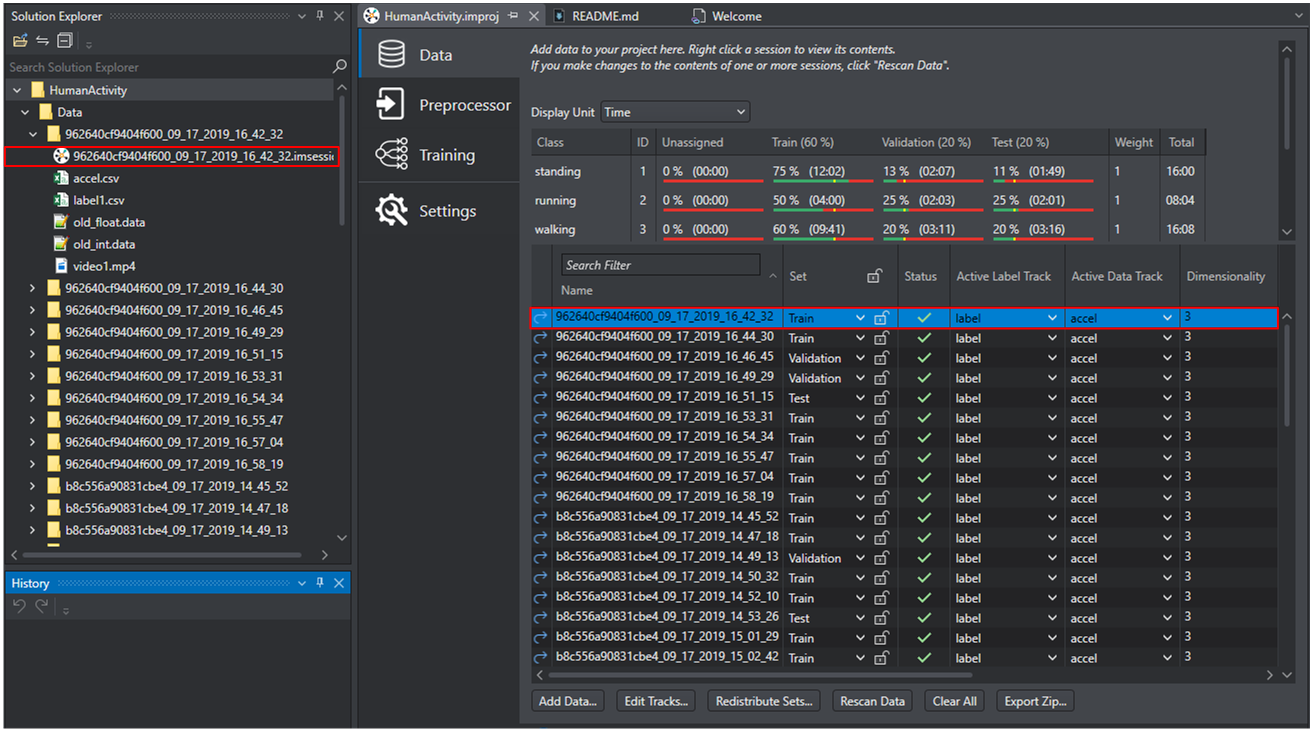
The data was imported into IMAGIMOB Studio. After the data was imported a session file (.imsession) and an empty label file (.label) is automatically generated for every data file in the Data directory. These new files will be used for labeling the data.
Data labeling
Data labeling allows labeling the raw data with the expected classification. When the model is being trained, the data is used, and the model gives a classification which is then compared to the label given by the user. The model weights are then adjusted depending on whether the correct classification was achieved.
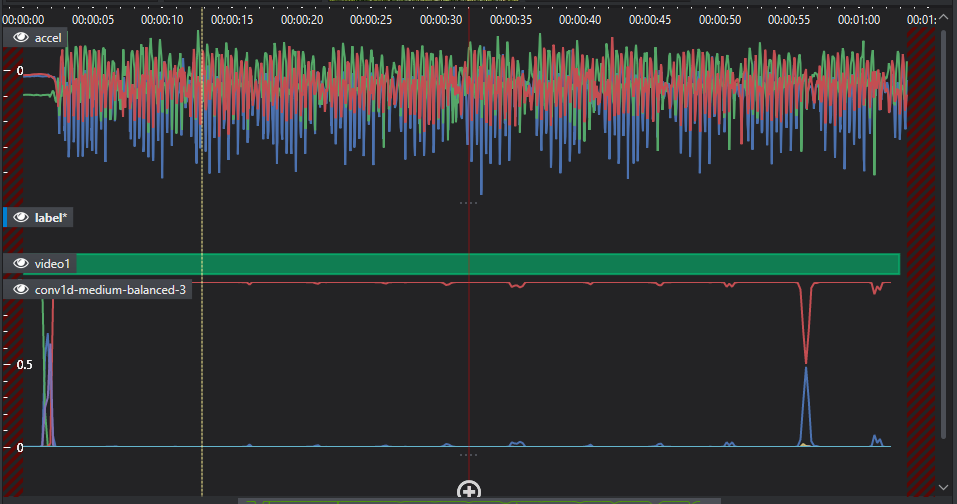
To make labeling simple, when adding data to a project, IMAGIMOB Studio adds a session file and an empty label file for every data file in the data directory. The session file displays data file and label file as data track and label track, respectively. Add labels in the label track, whenever needed.
To add labels in the label track, follow the steps:
-
Navigate to your project directory and open the session file (.imsession).
OR
Double-click the session file (.imsession) to open from the Data tab.
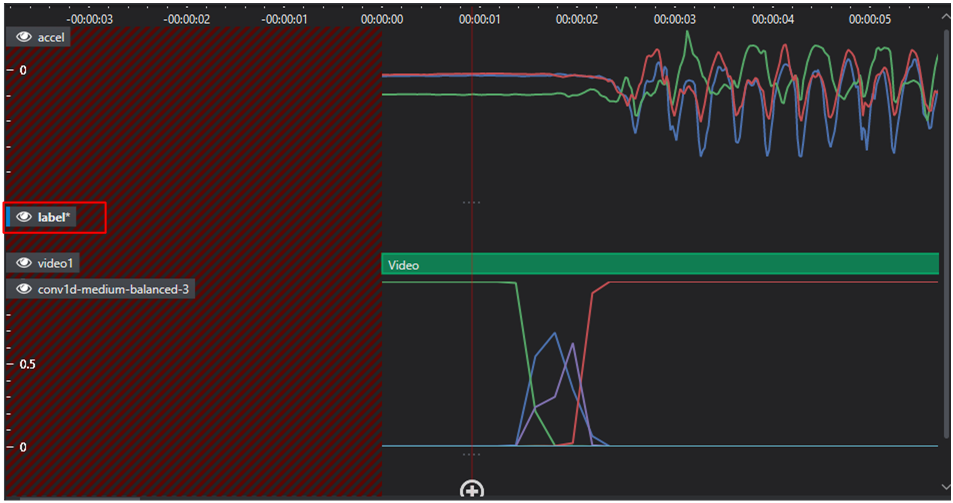
The session file opens a new tab where the collected data and label are viewed.
-
Locate and select the empty label track in the session file.
-
Zoom-in or zoom-out until the entire event is seen and navigate to the part to label.
-
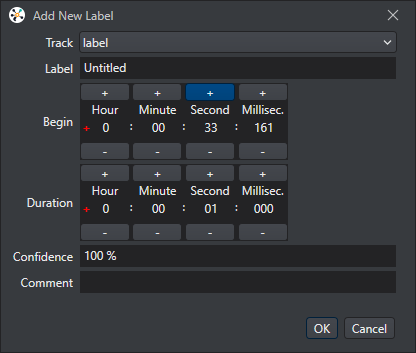
Move the cursor to the label track region, right-click and select New Label from the list of options. The Add New Label window appears.
-
Configure the following parameters:
Parameter Description Track Select the label track in which you want to add the labels Label Enter the name of the label to add for that specific piece of data in the track Begin Set the timestamp from where the label starts Duration Set the timestamp for how long the label lasts Confidence Enter the confidence percentage for the input label Comment Comment for label, if required If collecting data for the Human Activity Detection starter project, the following labels are supported, standing, running, walking, sitting, and jumping.
If collecting data for the Baby Crying Detection starter project, the supported label is baby_cry.
New labels can be added to the Human Activity Recognition and Baby Crying Detection starter projects, by labeling the data with the new desired label.
-
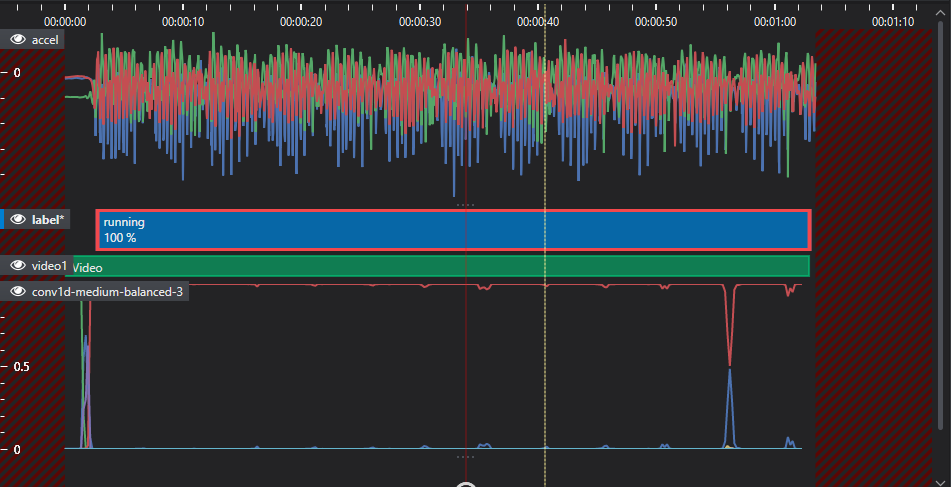
A new label is created, once the label is created it can be manually adjusted by dragging the sides to make it longer or grabbing the middle of the label to move it.
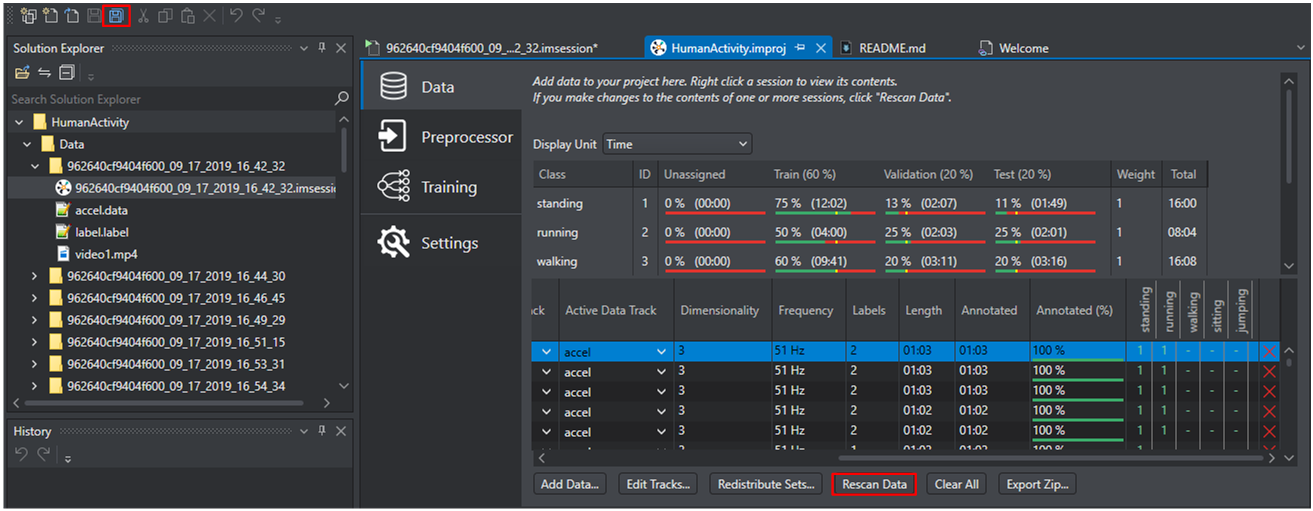
-
When all data is labeled, open the project file (*.improj) present in the project folder. Select Save All then select Rescan Data to ensure all labeling is registered by the project.
Repeat steps until all new data is labeled. The data is now ready for use to train the model.
Train-Validation-Test distribution
Now that all the data is labeled and included in the project, the data needs to be split into the following three groups.
-
Train data: Data used to train the model with
-
Validation data: Data that is used to test the model during training to determine how well the model is performing
-
Test data: Data used at the end of training to determine how well the model performs with data that the model has not been trained with
The standard split between the three data sets is 60 percent training data, 20 percent validation data, and 20 percent test data.
To distribute the data into the three sets:
-
Open the project file (*.improj) present in the project folder and select Redistribute Sets.

-
Set Scope as either Redistributing data from All Sets or from Unassigned sets. Use the graphical tool to distribute the data into different data sets.
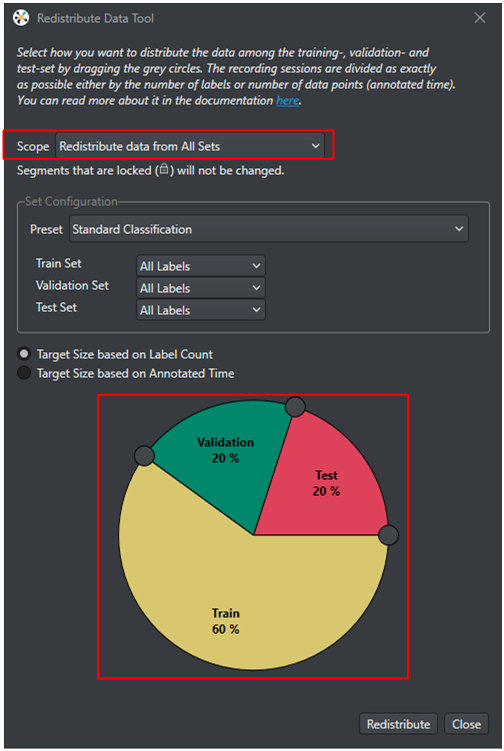
-
Select Redistribute and the data in the selected scope will be distributed among the three data sets.
After collecting the data, the next step is to configure the pre-processor. To know how to configure the pre-processor, refer to Pre-processing.