Real-Time Image data collection and labeling using camera
This topic provides information on how to collect and label real-time image data for creating object detection models using DEEPCRAFT™ Studio. You can add additional data to your existing projects or build your own dataset from scratch. You can collect both labeled and unlabeled data, depending on your project requirements.
How to collect and label real-time image data using DEEPCRAFT™ Studio?
Collecting and labeling image data in real-time is straightforward using Graph UX in DEEPCRAFT™ Studio. You can use any of the following cameras to collect image data in Studio:
- Built-in PC/Laptop camera
- External webcam
- Mobile phone camera via third-party applications, like Camo Studio
Step 1: Connecting the camera
Depending on your setup, connect your preferred camera source:
- If you want to collect the data using the Built-in PC/Laptop camera or External webcam, no additional setup is required.
- If you want to collect the data using the Mobile phone camera using the third-party applications, you need to connect the application with the PC/laptop.
You can use any third-party applications on your phone, provided the application recognized by your PC/laptop and appear in the Device Manager. We have tested using the application Camo Studio, which integrates seamlessly with DEEPCRAFT™ Studio.
Provided the phone and the DEEPCRAFT™ Studio are on the same network, follow the steps to set-up the Camo Studio:
- Open Camo Studio on your PC.
- Launch the Camo Studio app on your phone and tap the wireless connection icon.
- Scan the QR code displayed in Camo Studio to pair the devices.
- Once connected, your phone camera will appear as a selectable device in the DEEPCRAFT™ Studio.
This setup allows you to move freely while capturing high-quality images directly from your mobile device, enhancing the flexibility and efficiency of your data collection process.
Step 2: Creating Object Detection Data Collection Graph UX project
To start collecting the image data from studio, you need to create the Object Detection Data Collection Graph UX project which contains the graph. Refer to How to get started with Graph UX? for instructions on creating the Object Detection Data Collection Graph UX project.
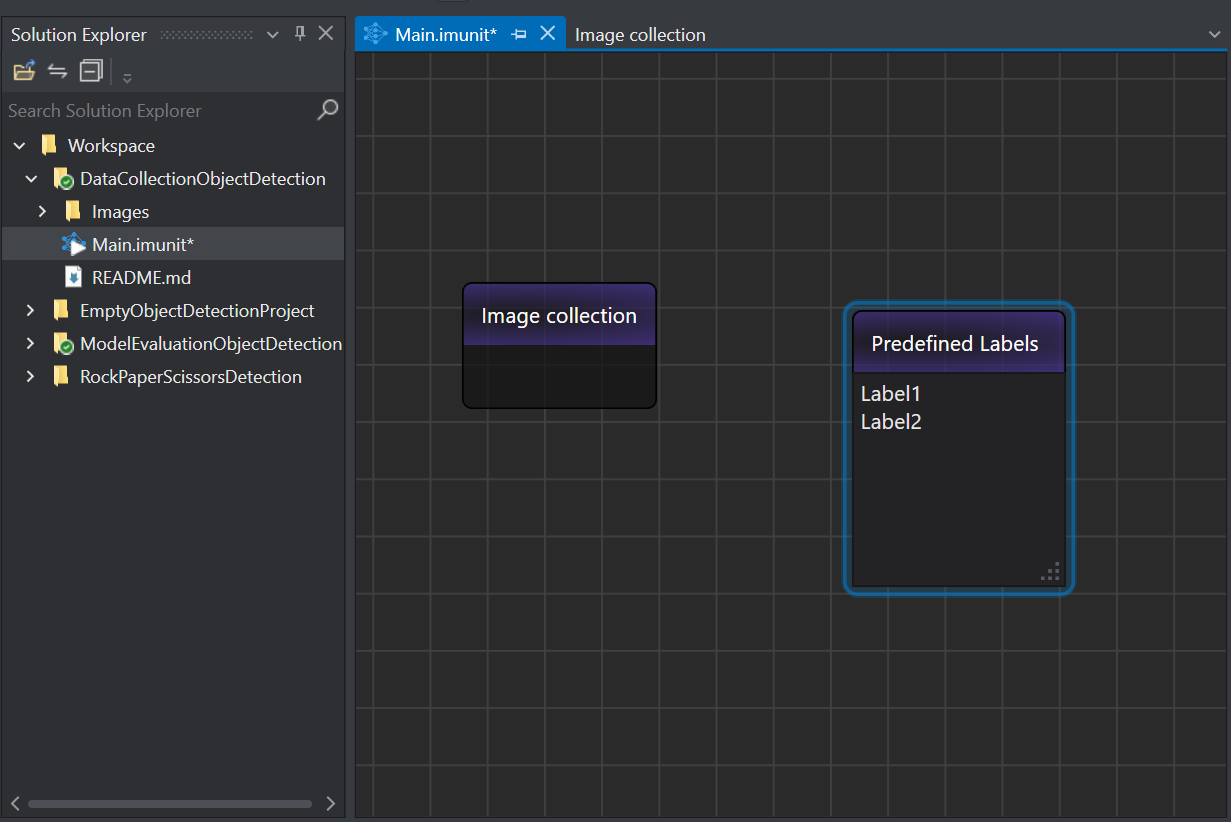
The Object Detection Data Collection Graph contains the Image Collection Node used for collecting the real-time image data and the Predefined Labels Node for defining the classes to be used for labeling the data.
Step 3: Set-up the Image Collection and Predefined Label Nodes
-
Click the Image Collection node to edit the settings in the Properties window.
Setting the Properties of Image Collection Node
Image Collection Node Properties Unit Unit Name: Displays the name for the unit. This parameter is not editable. Node Enabled: Turn the radio button ON or OFF to enable or disable the node respectively.
Node Name: Enter the name you want to assign to the node.Camera Burst mode: Turn the radio button ON to enable the burst mode. When the Burst mode is enabled, DEEPCRAFT™ Studio will automatically capture one image per second until the Stop Capture button is clicked.
Camera: Select the camera to be used for capturing the images. If you want to capture the images using web-cam or third-party applications, select the camera accordingly.
Resolution: Select the resolution for capturing the images from the list.File File Type: Select the file extension in which you want to save the images.
Filename Template: Displays the default filename format in which the captured images will be saved. The default filename format: (0)-(1), where 0 represents the Image Indexer and 1 represents the DateTime. You can edit the filename format in which you want to save the images. To know the filename formatting standards, refer to Composite formatting .
Target Folder: Click the three horizontal dots to browse and select the folder in which you want to save the captured images.
After setting up the Image Collection node, you can utilize the same graph to label the real-time data, by setting up the Predefined Labels node onto the canvas. Define the classes in the Predefined Labels node for one-time and utilize the defined classes to draw the bounding boxes on the collected images.
Setting the Predefined Labels Node
- Define the classes in Predefined Labels node by entering every class in a new line. By default, the Predefined Labels node displays some default classes.
- Navigate to File>Save or press Ctrl+S to save the graph.
After defining the classes, start collecting and labeling data simultaneously.
Real-time Image data collection and data labeling
-
Double-click the Image Collection Node to start capturing the images. The Image Collection window appears.
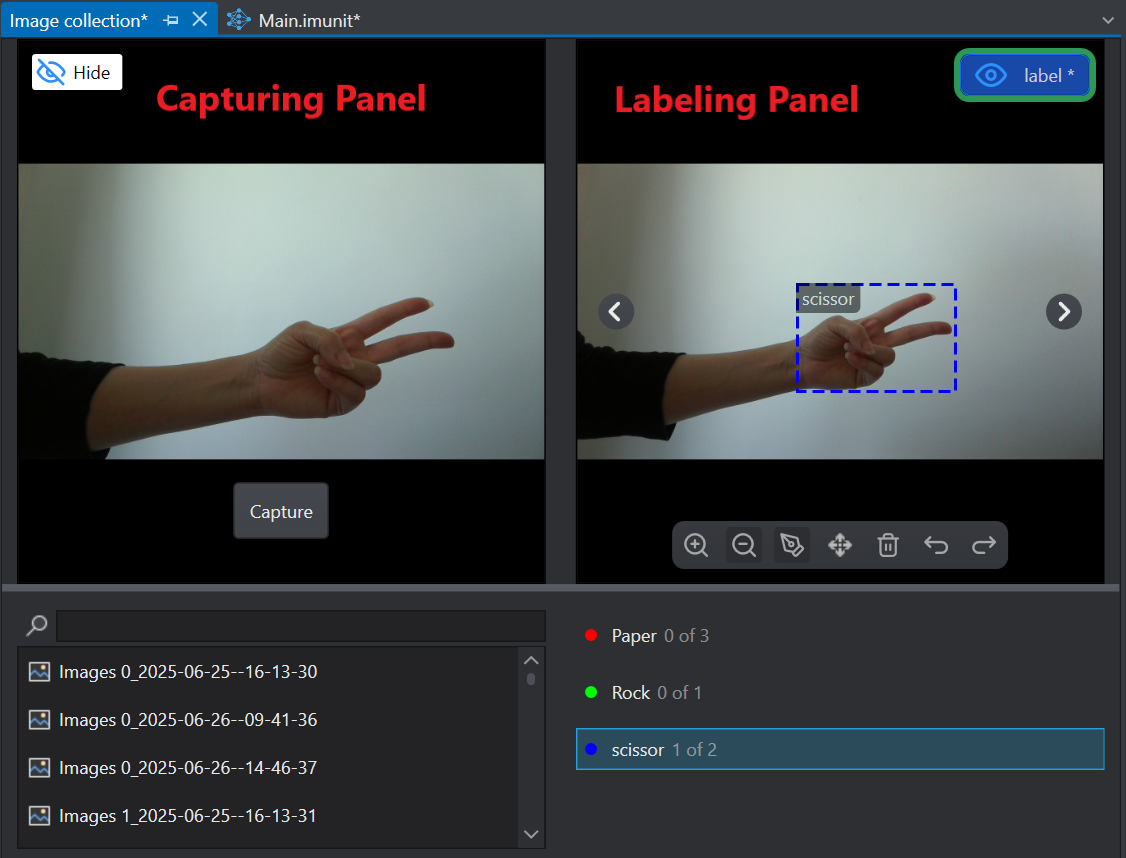
You will see the following panels:
-
Capturing Panel: The Capturing Panel enables real-time image capture through the Capture button. Once an image is captured, it is automatically added to the Image List displayed below the panel. Using the integrated Search Bar, you can search for the required image. To delete a captured image, simply select the desired image from the list and click the corresponding Trash Icon.
-
Labeling Panel: The Labeling Panel enables real-time image labeling using different tools. By selecting a class from the Predefined classes listed below the panel, draw the bounding boxes directly on the image. You can use the Next and Previous arrows to navigate to through the image list. The available tools allow you to perform different operations on the labels. For detailed information about each tool, refer to Tools for labeling the Images.
-
-
Click the Capture button to manually capture the images. However, if you have enabled the Burst mode, images will be captured automatically every second. To stop capturing the images, click the Stop Capture button. The captured images are displayed in the labeling window and listed below.
-
Select the image from the Image list that you want to label. The selected image appears in the Labeling window.
-
Select the desired class from the Predefined Classes list and select the Pen Tool to draw a bounding box around the relevant object in the image. The name of the selected class will appear in the top-left corner of the bounding box. Similarly, draw the required bounding boxes in the image. To label multiple classes, repeat the process with different class selections. You can use the available tools to draw the bounding boxes correctly. To know more, see Tools for labeling the Images.
-
After you have labeled the image, press Ctrl+ S to save the image. Similarly, you can select the other image from the list and drawing the bounding boxes as explained above.
Studio organizes each captured image within a nested folder structure. Each folder includes the image, a session file (.imsession), and a label file (.labelxml) containing bounding box information. If the image is not labeled, the folder will not contain a label file.
Tools for labeling the Images
| Icons | Tool Name | Description |
|---|---|---|
| Annotation Pen | Drawing bounding boxes | |
| Select tool | Select bounding boxes | |
| Pan | Move around the image. | |
| Hide annotations | Hide or unhide the annotations. | |
| Delete | Remove selected bounding boxes. | |
| Undo | Revert the last action. | |
| Redo | Reapply the last undone action. |
What next?
Once you have collected and labeled the images, you can import the dataset into the object detection project and start with training the model. To know how to import the collected dataset, refer to Adding data to object detection projects.
You can also collect the image data and label the images after importing into Studio. To know, how to label the images after importing into Studio, refer to Labeling Images.