Data Augmentation
When building a machine learning model, limited and non-diverse data can significantly affect the performance of a model. The primary challenge is to obtain diverse and sufficient data, as data scarcity remains a critical bottleneck in machine learning. To mitigate this issue, data augmentation serves as an effective strategy for generating large amount of diverse data. This process involves creating new data by modifying existing data through various augmentation techniques. By increasing the diversity and quantity of the data, data augmentation improves the robustness and generalizability of machine learning models, addressing challenges such as overfitting and class imbalance.
Data augmentation is supported for audio signals with a sampling frequency of 16 KHz mono only.
Data Augmentation Techniques
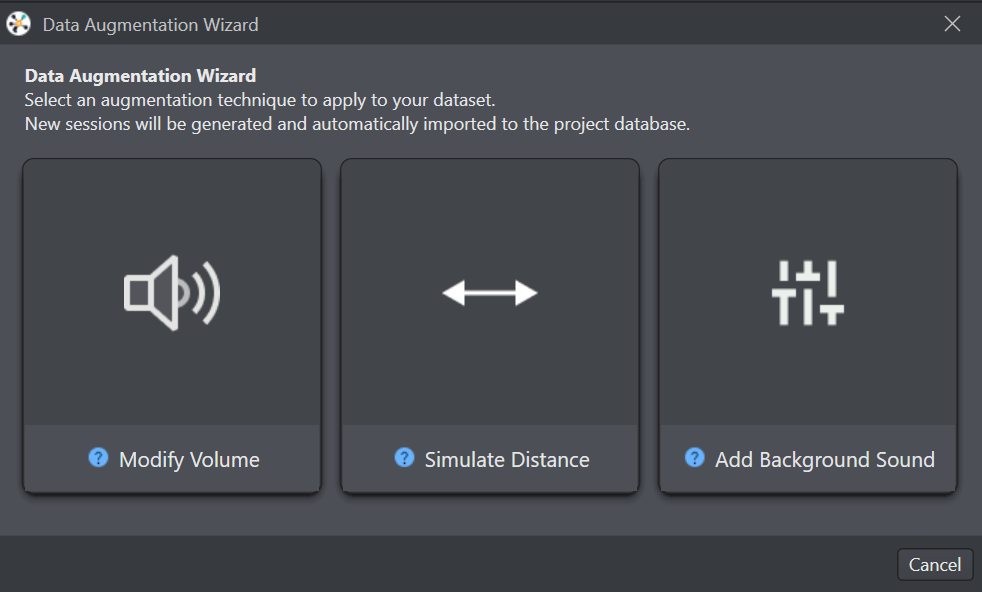
Studio provides the following methods for augmenting audio data:
- Modify Volume
Using this augmentation technique, you can adjust the volume of audio signals by applying a gain factor. This enables you to either amplify or attenuate the volume, thereby creating a more diverse dataset.
- Simulate Distance
Using this augmentation technique, you can simulate audio signals originating from various distances, different mediums, or diverse environments. This involves adjusting the audio characteristics to reflect changes in distance, such as attenuation, reverberation, and frequency response modifications. Additionally, you can incorporate room effects by simulating a cuboid with specified dimensions and average surface absorption coefficients. This simulation includes a sound source and a microphone placed at designated locations within the cuboid. These settings will simulate room of different sizes and conditions, such as echo or a dampened room, generating signals with variations in frequency and distance.
- Add Background Sound
Using this augmentation technique, you can integrate various categories of background sounds into the original audio signal. It involves overlaying the primary audio with different background sounds, such as baby cry, coughing, indoor, outdoor, and nature sounds to simulate diverse real-world environments.
Using the Augmentation Techniques
-
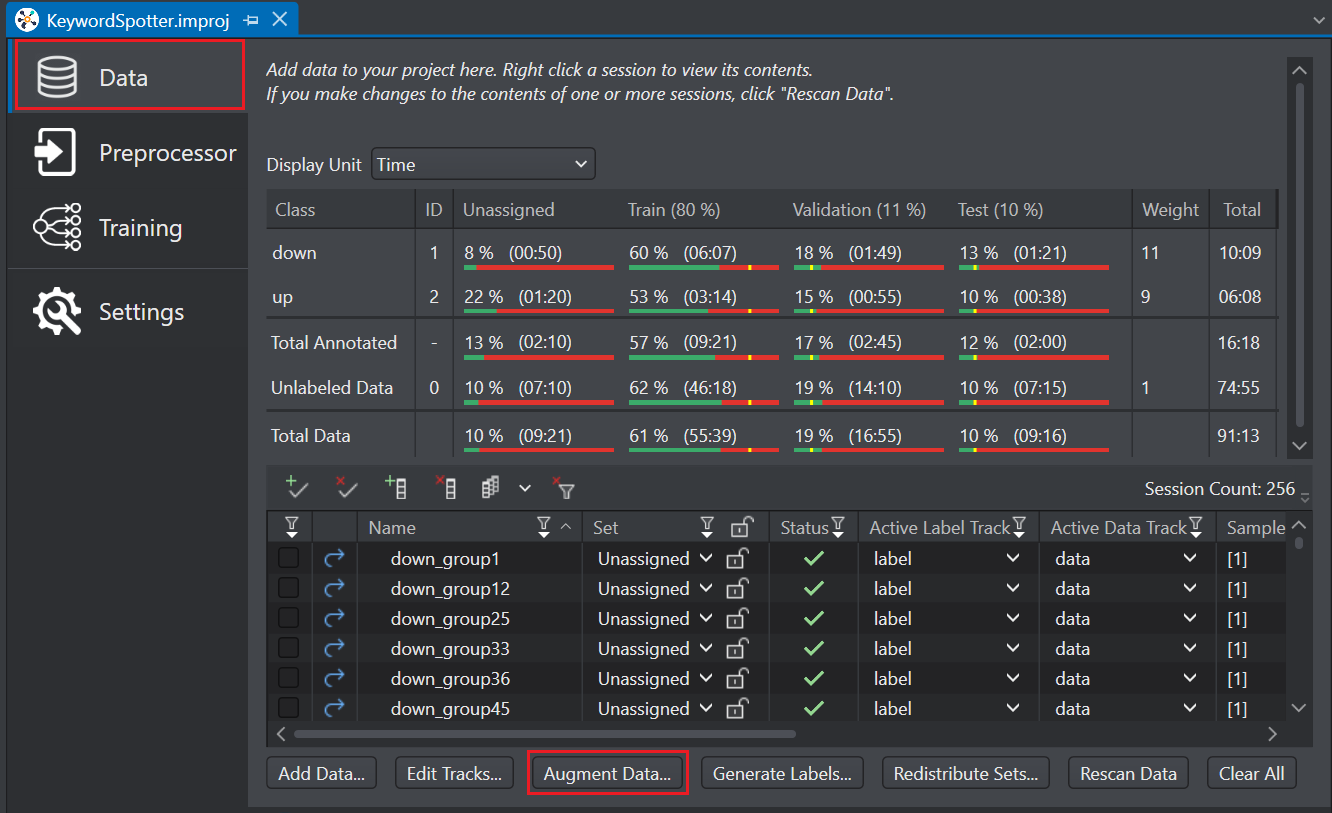
Navigate to the project directory and open the project file.
-
In the Data pane, select the sessions to which you want to apply the augmentation technique. You also have the option to select the sessions for augmentation at a later time.
-
Select Augment Data button at the bottom of the project file. The Data Augmentation wizard window appears.
-
Select the augmentation technique you want to use - Modify Volume, Simulate Distance, Add Background Sound
Using the Modify Volume Augmentation
To use the modify volume augmentation, follow the steps:
-
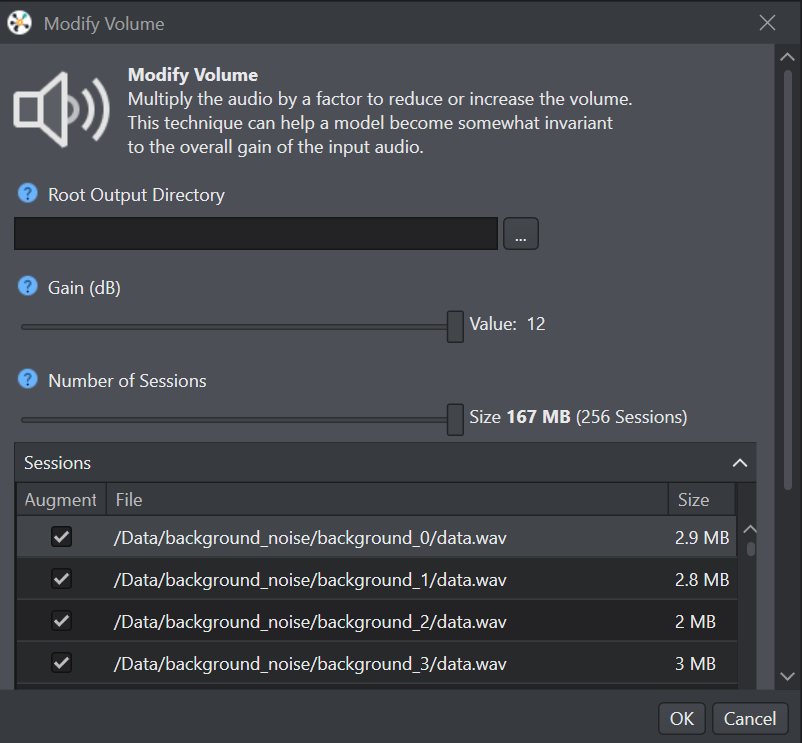
Select the Modify Volume tile as the augmentation technique. The Modify volume window appears.
-
In Root Output Directory, click the three dot and select the folder where you want to save the augmented files. A new folder containing the augmented data will be created within the selected root output directory.
-
In Gain, increase or decrease the volume of the audio signal by adjusting the gain value. When the gain value is set to 0, the volume of the signal remains unchanged. A gain value between 0 and 12 incrementally increases the volume, while a gain value between 0 and -12 incrementally decreases the volume.
-
In Number of Sessions, select and view the list of sessions to which you want to apply augmentation functionality. You have the option to select the required sessions either manually or randomly.
- To select sessions randomly, adjust the slider accordingly. Moving the slider to the right will select more sessions, while moving the slider to the left will deselect sessions. The slider also displays the number and size of the selected sessions.
- To select sessions manually, expand the list by clicking the downward arrow and checking the boxes next to the sessions you want to select.
Skip this step, if you have already selected the sessions from the Data pane.
- Click OK to apply the augmentation. The augmentation process initiates, and you can track the progress in the Output tool window. Upon completion, a new folder (named according to the type of augmentation, date, and time) is created within the root directory. This folder contains the augmented data and an Excel sheet detailing information about each augmented file.
Using the Simulate Distance Augmentation
To use the simulate distance augmentation, follow the steps:
-
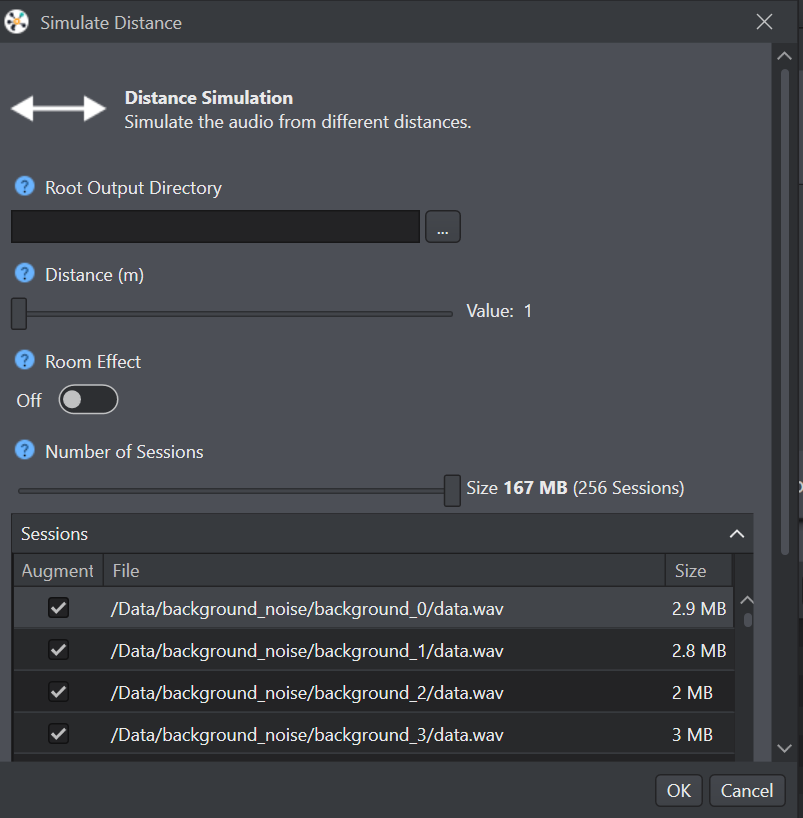
Select the Simulate Distance tile as the augmentation technique. The Simulate Distance window appears.
-
In Root Output Directory, click the three dot and select the folder where you want to save the augmented files. A new folder containing the augmented data will be created within the selected root output directory.
-
In Distance, set the distance from where you want to simulate the audio signal. When the distance is set to value 1, the audio signal is simulate for 1 meter and so on. You can simulate the audio signal from a maximum distance of 10 meters.
The distance augmentation assumes that the distance between the sound source and the recording device is 1 meter. If the difference between the true distance and this assumption is large it may lead to inaccurate results.
-
In Room Effect, enable the radio button if you want to incorporate the room effects by simulating a cuboid with parameterized dimensions and average surface absorption coefficients. This simulation also includes a sound source and a microphone placed at designated locations within the cuboid. These settings will simulate conditions such as echo or a dampened room. This parameter is particularly relevant if you want to augment data that is recorded with indoor settings.
-
In Number of Sessions, select and view the list of sessions to which you want to apply augmentation functionality. You have the option to select the required sessions either manually or randomly.
- To select sessions randomly, adjust the slider accordingly. Moving the slider to the right will select more sessions, while moving the slider to the left will deselect sessions. The slider also displays the number and size of the selected sessions.
- To select sessions manually, expand the list by clicking the downward arrow and checking the boxes next to the sessions you want to select.
Skip this step, if you have already selected the sessions from the Data pane.
- Click OK to apply the augmentation. The augmentation process initiates, and you can track the progress in the Output tool window. Upon completion, a new folder (named according to the type of augmentation, date, and time) is created within the root directory. This folder contains the augmented data and an Excel sheet detailing information about each augmented file.
Using the Add Background Sound Augmentation
To use the add background sound augmentation, follow the steps:
-
Select the Add Background Sound tile as the augmentation technique. The Add Background Sound window appears.
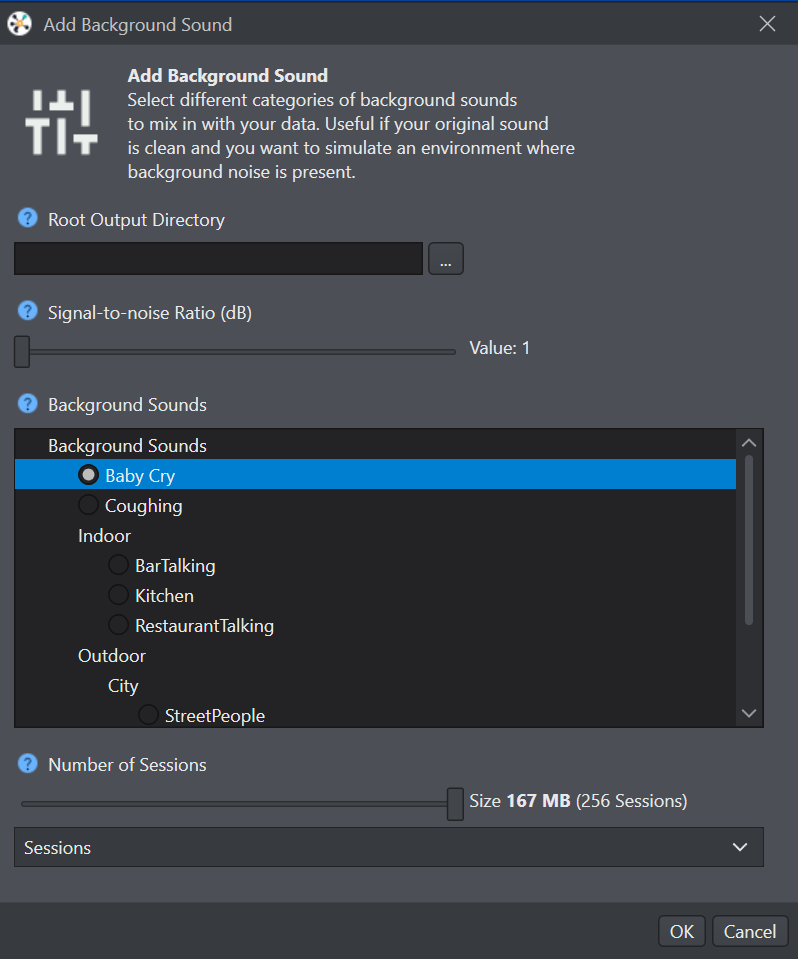
-
In Root Output Directory, click the three dot and select the folder where you want to save the augmented files. A new folder containing the augmented data will be created within the selected in root output directory.
-
In Signal to Noise Ratio, select the relative volume of the background sound compared to the foreground sound. A higher signal-to-noise ratio value indicates a lower volume of the background sound and vice-versa.
-
In Background Sounds, select the type of background sound you want to mix with the original audio data - baby cry, coughing, indoor, outdoor, or nature sounds. You can mix one type of background sound with the selected sessions at a time. To mix another background sound, repeat the background sound augmentation process with the same or different session files.
We are continuously expanding our database with additional background sounds. However, if the duration of the session file you wish to augment exceeds the total available background sound for a specific category, the session file will not be augmented.
- In Number of Sessions, select and view the list of sessions to which you want to apply augmentation functionality. You have the option to select the required sessions either manually or randomly.
- To select sessions randomly, adjust the slider accordingly. Moving the slider to the right will select more sessions, while moving the slider to the left will deselect sessions. The slider also displays the number and size of the selected sessions.
- To select sessions manually, expand the list by clicking the downward arrow and checking the boxes next to the sessions you want to select.
Skip this step, if you have already selected the sessions from the Data pane.
- Click OK to apply the augmentation. The augmentation process initiates, and you can track the progress in the Output tool window. Upon completion, a new folder (named according to the type of augmentation, date, and time) is created within the root directory. This folder contains the augmented data and an Excel sheet detailing information about each file.
After the augmentation process is completed, the augmented files are added to the project and placed in the same dataset as the original files automatically. The dataset of the augmented files is always dependent on the dataset of the original files. Any changes to the dataset of the original files will also affect the dataset of the augmented files. The dataset of the augmented files cannot be edited independently. When distributing data using the Redistribution tool, both the augmented and original files will always be placed in the same dataset. These functionalities are specifically designed to prevent data leakage and ensure data integrity.
After applying data augmentation, several automatic checks are performed to check the quality of the augmentation process. For instance, if an audio file already has a high volume and modify volume augmentation is applied to increase the gain, a significant portion of the signal may be clipped. This clipping can result in the file being discarded.