Testing using pre-compiled binary/hex files
This section covers information on how to flash the DEEPCRAFT™ Ready Models onto a kit using pre-compiled binary/hex files. This section also covers step-by-step instructions for testing the DEEPCRAFT™ Ready Models on PSOC™ 6 AI Evaluation Kit.
Flashing the DEEPCRAFT™ Ready Models
Following are the general instructions for flashing DEEPCRAFT™ Ready Models onto the PSOC™ 6 AI Evaluation Kit using pre-compiled binary and hex files. After you download the testing model (.hex) file labelled psoc62x-ai-eval-kit and have access to your board:
-
Download and open ModusToolbox™ Programming Tools .

-
In Programmer drop-down box, select the device type as KitProg3 CMSIS-DAP BULK-XXXXXXXXXXXXXXXX
-
In Board drop-down box, select the board type as CY8CKIT-062S2-AI.
-
Click Open and navigate to select the (hex file) downloaded earlier.
-
Click Connect to establish a connection between the board and the ModusToolbox™ Programmer.
-
Click Program to flash the hex file on the board. After the flashing is complete, close ModusToolbox™ Programming Tools. Your board is now running the model.
Opening Serial Terminal
Below are the steps to launch a serial terminal in ModusToolbox™ for evaluating the Ready Models in real-time, however, you can use any serial terminal with the same settings.
-
Open ModusToolbox™ and press (Ctrl+Alt+Shift+T) to launch the Terminal.
-
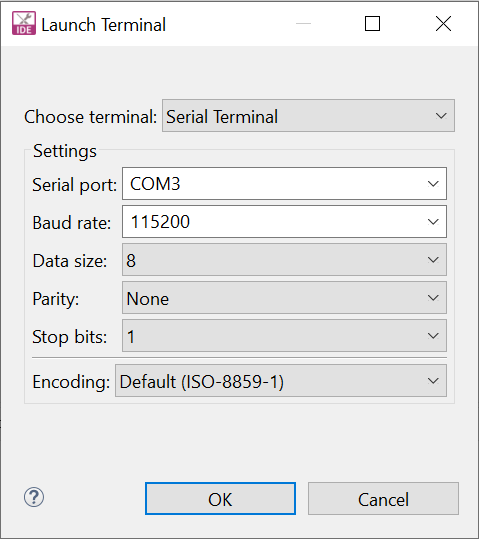
In Choose terminal, select Serial Terminal
-
In Serial port, select the COM port corresponding to your board. (This can be identified in the Device Manager).
-
Set the following parameters as:
- Baud rate (speed): 115200,
- Data: 8 bit,
- Parity: None,
- Stop bit: 1
-
Press OK.
Testing the DEEPCRAFT™ Ready Models
This section covers step-by-step instructions for testing the DEEPCRAFT™ Ready Models on the PSOC™ 6 AI Evaluation Kit.
Testing the Audio Models
To test the audio model on the PSOC™ 6 Artificial Intelligence Evaluation Kit, follow the steps below:
- Download the (.hex) file labeled psoc62x-ai-eval-kit from the email.
- Connect your PSOC™ 6 AI Evaluation Kit to a PC using the USB-C J1 port, which is used for flashing the board.
- Flash the hex file onto the board, see Flashing the board.
- Open a serial terminal, see Opening Serial Terminal.
- Place a high-quality speaker near the board, phone speakers are not recommended.
- Play sounds through the speaker. Check the models testing documentations for details such as effective range.
- Observe the output of the serial terminal; a message will appear when the model is triggered.
Testing the Fall Detection Models
The model is tailored to detect dangerous falls of elderly people, and performs the best on unpadded falls. However, we recommend testing with a healthy adult and placing pillows to avoid injury - the model works well in these instances too. The model is designed to have a very low FP per user per week; for that reason, it requires the person to lay still for 15-20 seconds after the fall.
To test the fall detection model on the PSOC™ 6 Artificial Intelligence Evaluation Kit, follow the steps below:
-
Download the (.hex) file labeled psoc62x-ai-eval-kit from the email.
-
Connect your board to a PC using the USB-C J1 port, which is used for flashing the board.
-
Flash the hex file onto the board, see Flashing the board.
-
Disconnect the board from the PC and connect a Lithium Ion Battery rated 3.6V-4.2V with JST-PH connector.
-
Attach them to your wrist with orientation as per shown in image below, using strong tape to hold it in place is recommended.
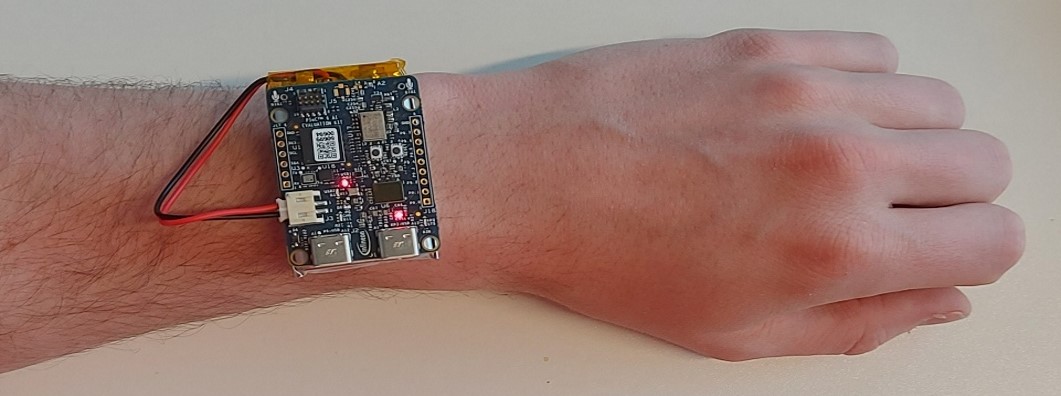
Figure 1: Bird’s eye view of arm flat on table
-
Fall as realistically as possible in a safe manner; make sure to lie still for 15-20 seconds after the fall.
-
If a second red LED on the front of the board lights up, a fall has been detected. It stays lit for 10 seconds.
Testing the Gesture Detection Models
To test the gesture detection model on the PSOC™ 6 Artificial Intelligence Evaluation Kit, follow the steps below:
-
Download the (.hex) file labeled psoc62x-ai-eval-kit from the email.
-
Connect your board to a PC using the USB-C J1 port, which is used for flashing the board.
-
Flash the hex file onto the board, see Flashing the board.
-
Open a Serial Terminal, see Opening Serial Terminal.
-
Place the board on a stable surface or tripod, with orientation as shown in the image below:
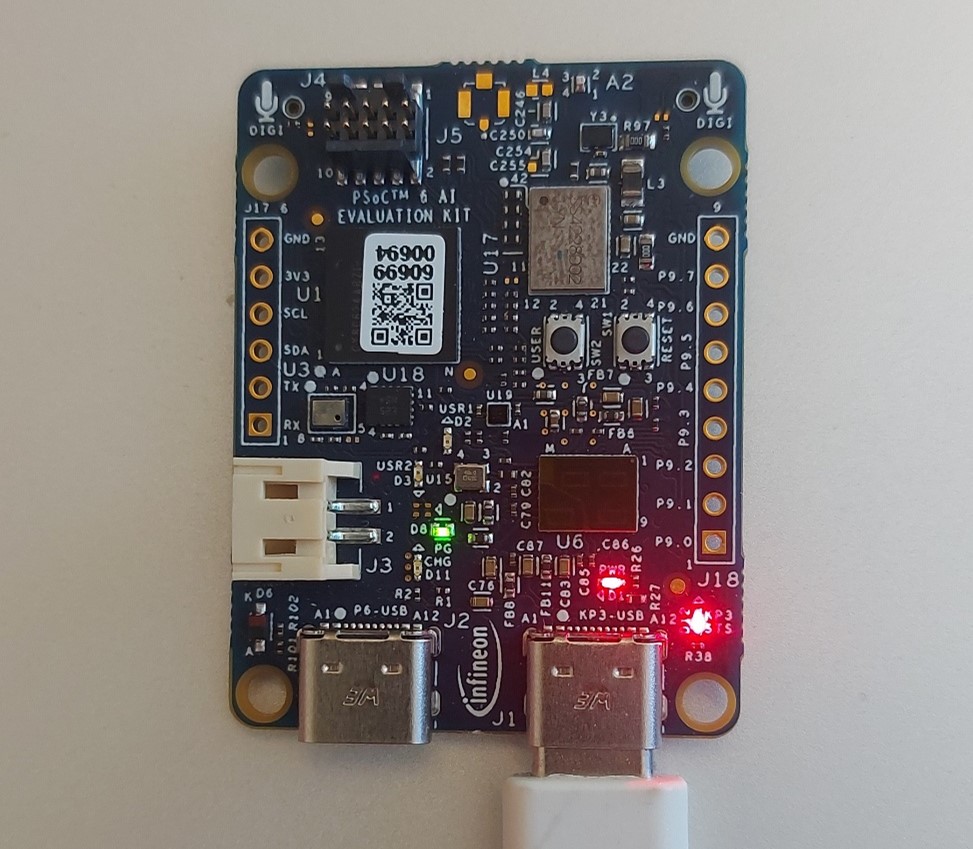
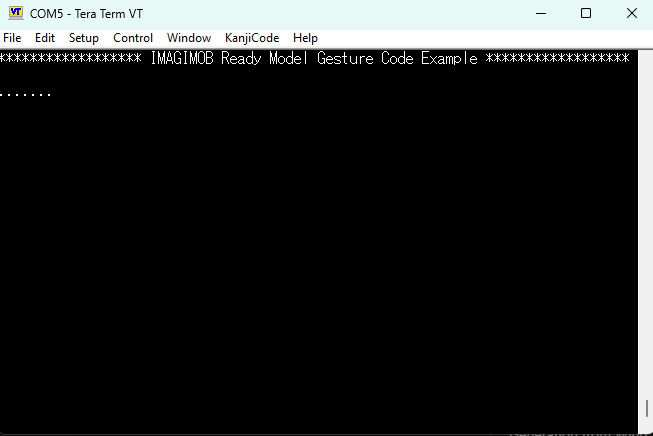
Figure 2: Front view of board orientation for gesture detection
-
Perform gestures in front of the board, taking around 0.5 - 1 seconds per gesture and at a distance of 10-70cm. See testing document for more details
-
When detected, the gesture will be printed in the serial port.