Collect and label data using any development boards
We provide the streaming firmware for selected Infineon boards, implemented using the Streaming Protocol version 2. If you want to collect data from other development boards or sensors, you need to integrate the protocol into your firmware and implement the corresponding sensor drivers for that hardware. To flash the streaming firmware onto infineon boards, refer to Infineon Development Kits.
For step‑by‑step instructions on how to integrate a sensor or development board using the protocol, illustrated with the Toy device as an example, refer to Registering sensors and boards for data streaming using Protocol version 2. You can apply the same principles from that example to your own sensors, follow the user journey to register your sensors or development boards and start data collection. After you implement the firmware, build and flash the firmware onto your device following the specific board documentation.
After you complete the firmware integration, stream data from your actual sensors using the same method demonstrated with the Toy device.
How to collect and label real-time data from the sensors?
Collecting and labeling data in real-time is straightforward using Graph UX in DEEPCRAFT™ Studio. Follow these steps to efficiently collect and label your data using the Toy device:
Step 1: Create Graph UX Project
To create a Graph UX project for data collecting, follow the steps:
-
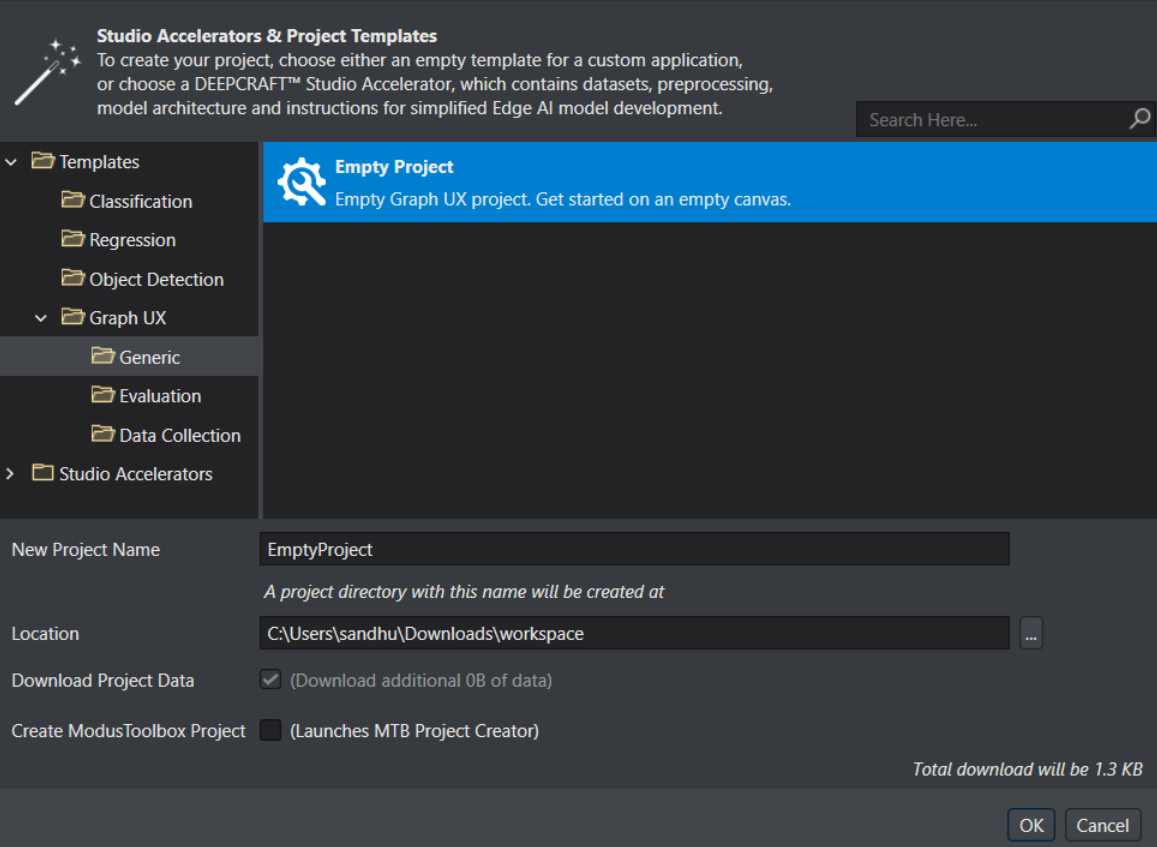
In DEEPCRAFT™ Studio, navigate to File> New Project. The New Project window appears.
-
Expand Templates> Graph UX> Generic and to select Empty project.
-
In New Project Name, modify the name of the project, if required.
-
In Location, specify the location where you want to save the project directory.
-
Click Ok to create the project.
-
Expand EmptyProject directory and double-click the Main.imunit to open the canvas.
Step 2: Connect the sensor or development board to PC/laptop
Connect the sensor or development board to the laptop or PC and navigate to Node Explorer Window> Boards to check if the board is connected properly. The development board, along with all the sensors should be displayed under Boards.
-
If the Node Explorer Window is not open, navigate to View> Node Explorer to access the window.
-
If the board and sensors are not displayed under Board in Node Explorer, navigate to Tools> Options> Graph UX> Capture Nodes and select Use Node Explorer with Protocol Version 2.
Step 3: Create Data Collection and Data Labeling Graph
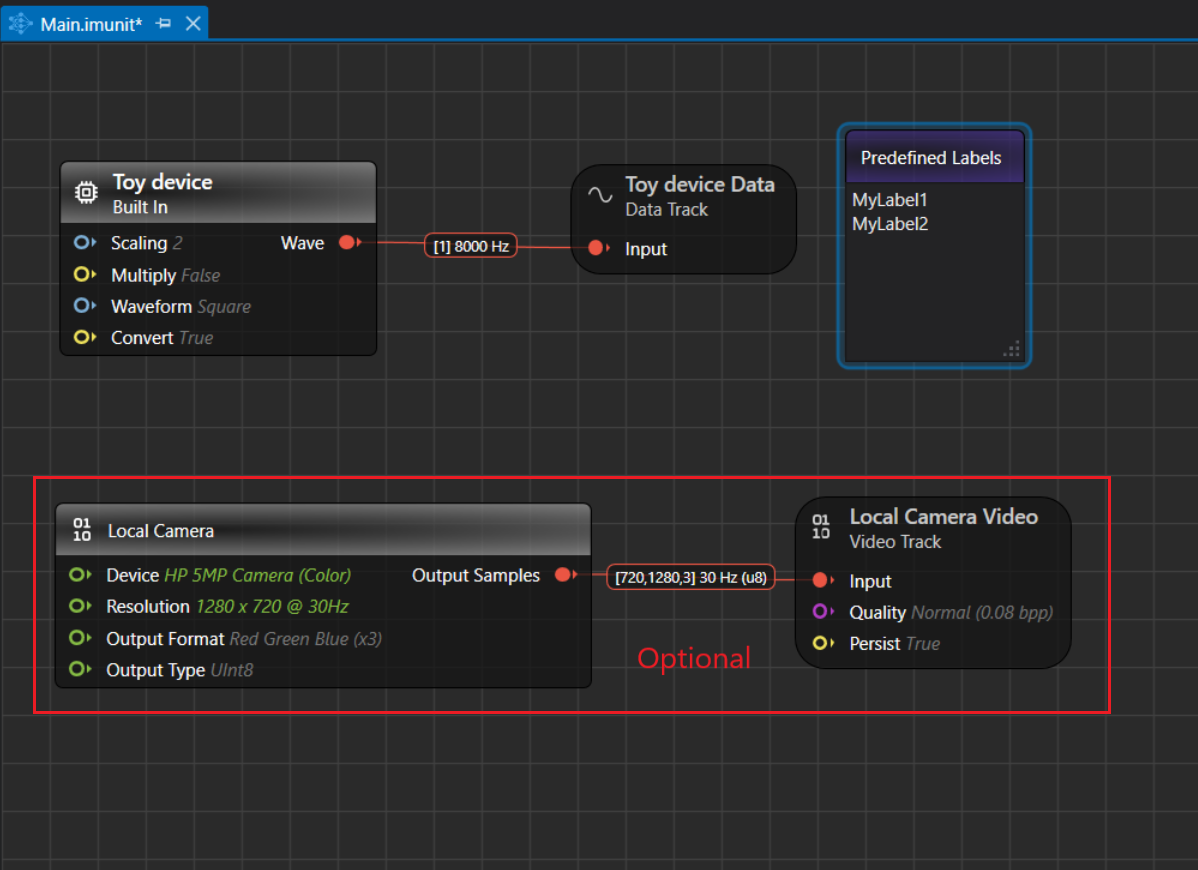
To create a simple data-collection and labeling graph, add a sensor to stream real-time data, a data track to visualize and label the data stream, and Predefine labels node to define the labels. Optionally, you can also add a Local Camera node and a video track to record a video alongside sensor data collection, providing a visual reference for labeling the sensor data. After connecting the board to the PC and creating a Graph UX project, let’s set up the Sensor unit for data collection and Predefined unit for data labeling on the canvas.
Setting up the Toy Sensor
-
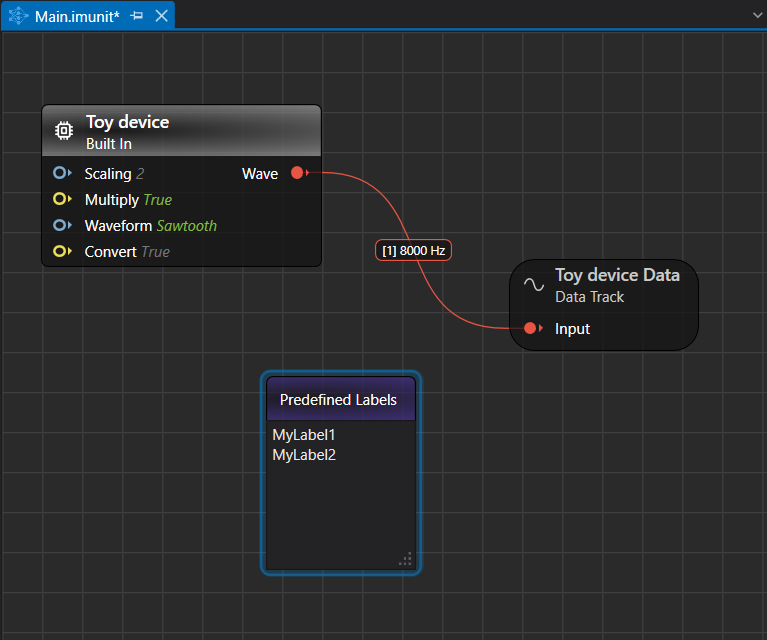
Navigate to the Node Explorer window, expand Boards> Sensor board and drag and drop the Toy device sensor onto the canvas.
-
Navigate to the Node Explorer window, expand Library> Tracks and drag and drop the Data Track onto the canvas.
-
Click on the red icon in the Toy device node and drag over to the red icon in the Data Track node. This creates a connection between the two nodes.
-
Click on the Toy device sensor node to edit the settings in the Properties window, if required. For instance, you can select Waveform: Sawtooth, Triangle, Square, Sin(xt). Similarly, for your sensor configure the settings, as needed.

After setting up the Toy device node, you can utilize the same graph to label the real-time data, by adding a Predefined Labels unit onto the canvas. Define the classes in the Predefined Labels node for one time and utilize the defined classes to label the data on a click of button.
Setting up the Predefined Labels
-
Navigate to the Node Explorer window, expand Library> Annotation and drag and drop the Predefined Labels unit onto the canvas. The Predefined Labels unit displays the default classes.
-
Define the classes in Predefined Labels node by entering every class in a new line.
After defining the classes, you can start collecting and labeling data simultaneously. You can also set the Local Camera to collect the video data along with the sensor data. You can use the video to label the sensor data.
Setting up Local Camera for collecting video data is an optional step, you can skip and start with real-time data collection.
Setting up the Local Camera (Optional)
To set up the Local Camera, follow the steps:
-
Connect a camera or use the built-in camera of the laptop or PC.
-
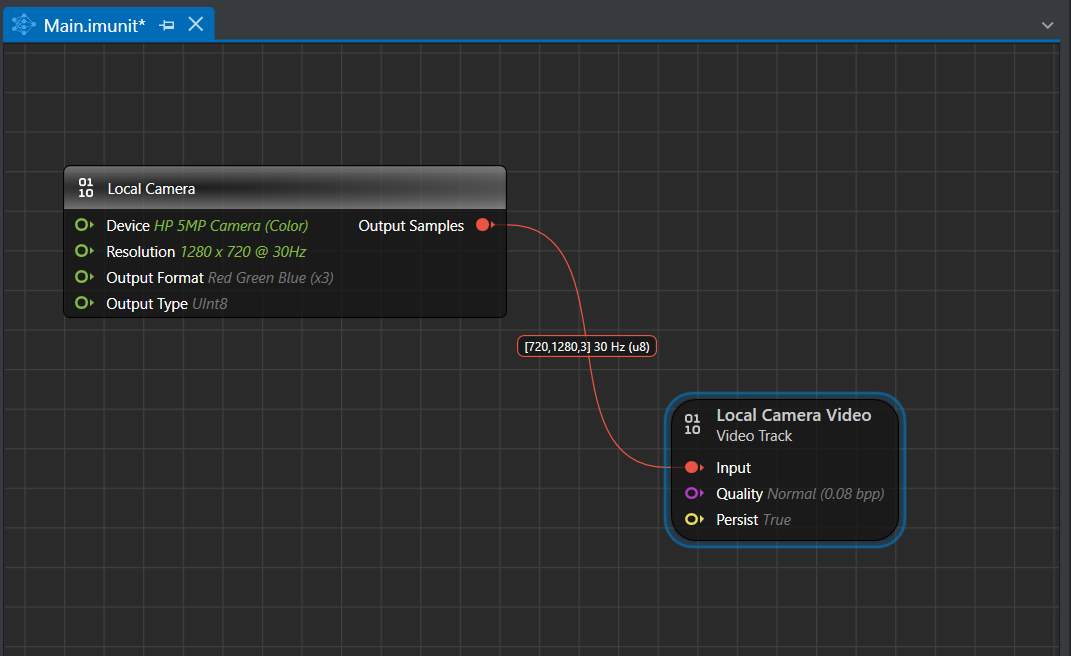
Navigate to Node Explorer window and expand Library> Capture Devices and drag and drop the Local Camera unit onto the canvas.
-
Click on the Local Camera node to edit the settings in the Properties window, if required.
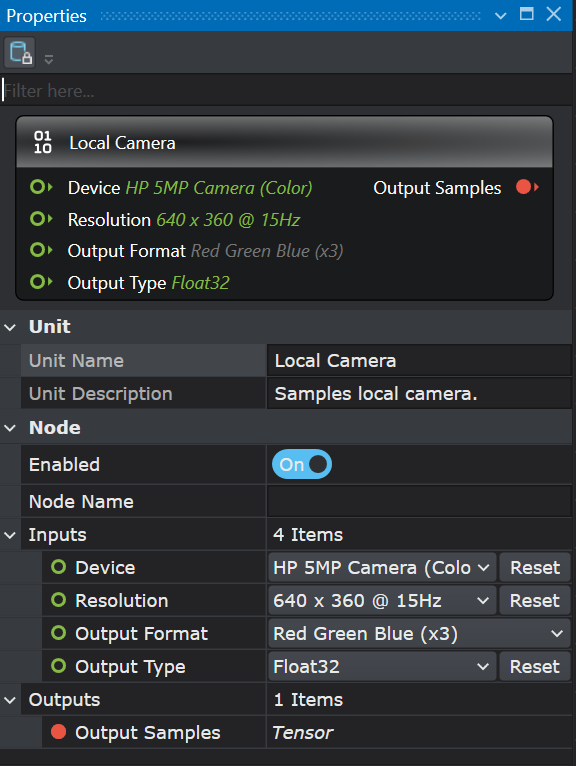
The table represents the default properties of the local camera:
Local Camera Node Properties Unit Unit Name: Displays the name for the unit. This parameter is not editable.
Unit Description: Displays the description of the unit.Node Enabled: Turn the radio button ON or OFF to enable or disable the node respectively.
Node Name: Enter the name you want to assign to the node.Inputs Device : Select the device to be used for recording the video.
Resolution : Select the resolution for recording the video from the list.
Output Format : Select the output shape from the list.
Output Type : Select the output type from the node: UInt8 or Float32.Outputs Output Samples : Displays the output sample. -
Navigate to Node Explorer window and expand Library> Tracks and drag and drop the Video Track unit onto the canvas.
-
Click on the Video Track node to edit the settings in the Properties window, if required.
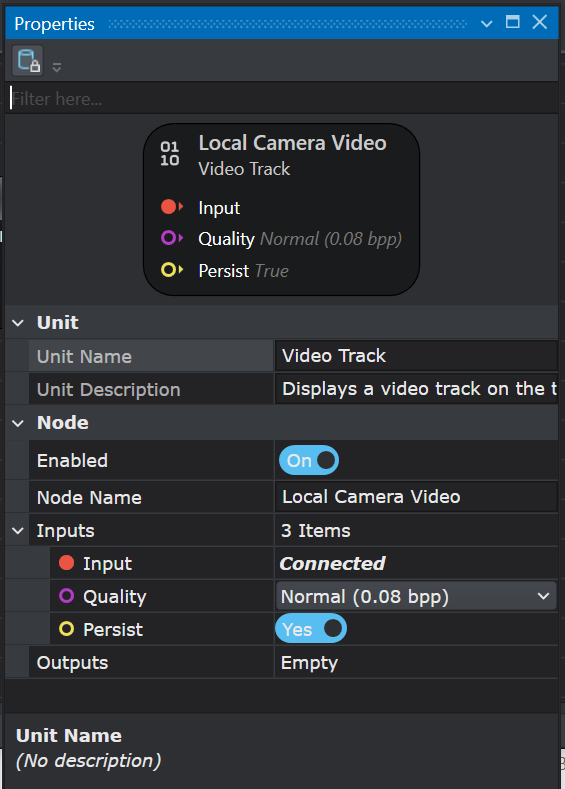
The table represents the default properties of the Video track:
Video Track Node Properties Unit Unit Name: Displays the name for the unit. This parameter is not editable.
Unit Description: Displays the description of the unit.Node Enabled: Turn the radio button ON or OFF to enable or disable the node respectively.
Node Name: Enter the name you want to assign to the node.Inputs Input : Displays the connection status of the video track node.
Quality : Select the quality (bits per pixel) at which you want to record the video.
Persist : Enable or disable the persist option.Outputs Output Samples : Displays the output sample.
Disabling the Persist option enables real-time video streaming without saving the footage. As a result, replaying or rewinding the video will not be possible. This configuration is optimal for real-time model evaluation when video storage is not required.
- Connect the Output of the Local Camera Node to the Input of the Video Track by clicking on the red icon in the Local Camera node and dragging over to the red icon in the Video Track. This creates a connection between the two nodes.
Step 5: Real-time data collection and data labeling
-
Navigate to the toolbar and click the Start button to open the session file (live.imsession). An empty session file opens displaying the pre-defined classes in the Labels bar.
-
Click the Record button to start capturing the real-time data.
-
In the Labels bar, select a class to start adding labels to the streaming data.
-
Deselect the same class to stop adding the labels. Similarly, you can enable or disable the other classes and label the data.
-
Click the Record button to stop collecting the data.
-
Select File > Save to save the session file, data track and label track. The Save New Session window appears.
-
In Location, click the three dot and select the desired location to save the files.
-
In Session Name, enter the name of the session file.
-
Under Track Options, set the following:

- In Wave Format Encoding, select the encoding format for the audio tracks
- In Track Name, double-click the column to edit the track names, if required
- In File Name, double-click the columns to edit the track names, if required
-
Select the save checkbox corresponding to the tracks you want to save.
-
Click OK to save the files.
-
Repeat the instructions from step 2 to collect and save data in multiple session files.
After collecting the data, add data to the required project and start with the machine learning workflow in Studio. Refer to Create project and Add data to project to know more.
If you prefer not to collect and label data simultaneously, you can first collect the data. Once the data collection is complete, simply press the play button in the session and begin labeling by selecting the appropriate labels in the Labels bar.