Bring your own data for classification and regression projects
Before you import data, you must prepare your data in the format supported by DEEPCRAFT™ Studio.
Listed below are the specifications that you must follow to format your data.
What data formats can you import?
You can import different types of data, including audio, video and timeseries data. The table lists the supported data formats.
| Data Type | File Type |
|---|---|
| Audio | .wav |
| Data | .csv, .data, .label |
| Video | .mp4 |
Data file
Data file is a regular comma separated values (.csv) file that contains the unstructured data with timing information for one single recording. A data file must meet the following specifications:
-
Each data file should contain the data for a single recording.
-
The naming convention of the data files depend on how the data is organised in the directory:
-
If the data is organised in a nested directory, the name of the data files in all the directories should be identical.
-
If the data is organised in a flat directory, the name of the data files must be recordingname_trackname, where recordingname is a unique recording identifier and trackname is the track name to be displayed in Studio. To know more about the directory structure, refer to Structuring the data directory.
-
-
The file extension should be .csv or .data.
-
The file should be UTF-8 encoded.
-
The first line of the file should be a header line providing column names separated by commas.
-
The remaining lines should consist of floating point numbers separated by commas.
-
The first column should contain the time in seconds from the start of the recording. The timestamps should be increasing.
-
The remaining columns should contain the entire unstructured input data points.
-
The floating point numbers should use a period (.) for decimal separation.
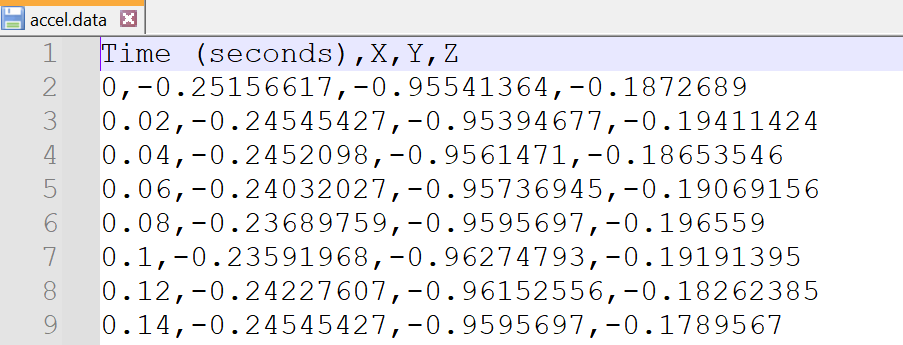
Below is a sample data file:

Label file
Label file is a regular comma separated values (.csv) file that specifies the classification labels with timing information for a recording. A label file must meet the following specifications:
-
Each label file should contain the class labels for a single recording.
-
The naming convention of the label files depend on how the data is organised in the directory:
-
If the data is organised in nested directory, the name of the label files in all the directories should be identical.
-
If the data is organised in the flat directory, the name of the label file must be recordingname_trackname, where recordingname is a unique recording identifier and trackname is the track name to be displayed in Studio. To know more about the directory structure, refer to Structuring the data directory.
-
-
The file extension should be .label.
-
The file should be UTF-8 encoded.
-
The first line of the file should be a header line providing column names separated by commas.
-
The remaining lines should consist of label information fields separated by commas.
-
The floating point numbers should use a period (.) for decimal separation.
-
The file should have the following columns:
- The Time column should list the starting time of the label in seconds.
- The Length column should list the label length in seconds.
- The Label column should list the class identifier. The value allowed is string.
- The Confidence column should list the label confidence in the interval [0.0 .. 1.0], typically 1.0.
- The Comment column should list the comment for your reference. This is optional and the value allowed is string.
- The Time column should list the starting time of the label in seconds.
Below is a sample label file:

Structuring the Data directory
After you create the project, the next step is to import the data into the project. You can import your existing dataset to an empty classification project to start building the model from scratch. You can also import additional dataset to a starter project and fine tune the model as per your business scenarios.
Nested folder structure
Studio supports the Nested folder structure for importing the data. To import data using the nested folder structure, follow the requirements:
- Each recording should be placed in an individual folder.
- Each recording can contain multiple data, video or label files.
- The data-label file pair in each folder should be named identically.
- The name of data file in each each folder should be named identically.
- The name of label file in each each folder should be named identically. It is recommended to keep the file name of all the label files as label.label.
Studio will display the file name of the data and label file as the track name in the session file.
A sample nested directory, where Data_A, Data_B, Data_C and Data_D represents the directories, and each directory consists of one data track (.data) and one label track (.label).
- accel.data
- label.label
- accel.data
- label.label
- accel.data
- label.label
- accel.data
- label.label
After you have formatted the data as per the specifications listed above, you can now add data into your project in Studio. Refer to Adding data to classification and regression projects.