Testing using the Libraries in Custom Applications
This section covers the steps for testing the Libraries in custom applications.
Step 1: Obtaining the Libraries
You can obtain the libraries from the following:
- Imagimob Website – both the evaluation and full version
- Infineon Developer Centre – both the evaluation and full version
- ModusToolbox™ - only the evaluation version
The evaluation and full version are identical model-wise.
Step 2: General Principles and Processes
This section outlines at a higher level what you need in order to effectively use the Ready Models in a general order.
-
Load a desired starting point for a project, this could be your own custom application, a hello world project, a communication project or a sensor reading project – typically these are chosen based on the most complex component.
-
Ensure the hardware is set up correctly, including the desired pins, sensors and peripherals. For instance, if you want to communicate the output via Bluetooth, ensure that the necessary Bluetooth setup is properly configured. The models are designed to slot in easily,so is recommended to conduct the thorough testing in advance to ensure everything is working, thus the minimizing debugging later.
-
Setup the sensor to the desired specification and configuration, for all the Ready Models we have detailed information in the report on how the sensors should be configured to be compatible with the model.
-
Apply basic processing to the incoming data to ensure it matches the higher-level requirements. This could be things like converting the integer output to SI units or re-orienting the sensor to match the required orientation or applying gain to reach the right levels. These are usually software additions you need to add.
-
Now you are ready to add the model:
- Add the header and the library to your program or application for some models you might have extra files, include everything that is mentioned in the report.
- Somewhere at the beginning of the program add the initialisation function which you can find in the header file. This only needs to be called once but can be called more often to reset the model buffers. Example, if you are waking up the device, it is good to run the initialisation again to prevent old data lingering in the buffers.
- When you have new data coming in from the sensors call the sensor input function, typically this function is called the enqueue function. The model will handle the buffering internally so you can just feed it the data one at a time every time a new sample is obtained.
- After you pass data in through the input function check if the output function returns a success, if it does, this means that you have a new prediction ready for consumption. If not, then either more data is needed to fill the buffers or there was an error in the processing.
- Add the header and the library to your program or application for some models you might have extra files, include everything that is mentioned in the report.
-
Once you have the model output you can display it to the user; this can be through a variety of different ways, it could be through flashing an LED, printing something to a terminal, send a notification over Bluetooth or other communication protocols or you can send a signal to a different component in the hardware to trigger its functionality.
-
Now you have everything in place and you can begin testing your implementation.
A good starting point for learning how to use the models is to refer to the code example (opens in a new tab) available in ModusToolbox™ for the PSOC™ 6 AI Evaluation Kit.
Testing the Audio Models
To test the audio model on a general board, follow the steps above with the following things in mind:
- Configure your settings to the right specifications for the sampling frequency, bit resolution and the number of channels, ensure that the output is in the right type. The most common settings we use: 16 kHz, 16 bit, Float, Mono channel, convert the data type to float in the range of -1.0 to 1.0
- Verify this with the specific model report you are interested in.
When testing the audio models, they are designed to work primarily with real sounds so ideally you should test them with a live environment. For example, to test the snore detection it is recommended to run it over night and look at the performance or for a baby cry it is recommended to give it a person with a baby to test out. However, since this is not always possible, you can get a realistic sound by using high quality speakers where possible that are able to accurately reproduce a natural sound.
Testing the Fall Detection
To test the fall detection model on a general board, follow the steps above with the following things in mind:
- Scale the values of the accelerometer to SI metric system in Gs.
- See the code example in the main loop, refer to Figure-3
   // Main loop
for ( ; ; )
{
	…
	// Get raw accelerometer data from IMU sensor
	…
int acc_x = < X RAW DATA > ;
	int acc_y = < Y RAW DATA > ;
	int acc_z = < Z RAW DATA > ;

// Set the SI metric system scaling factor
float ACC_SCALE = < YOUR SI SCALING FACTOR > ;

// Convert raw data into SI data
float acc_x_f = (float) acc_x * ACC_SCALE;
float acc_y_f = (float) acc_y * ACC_SCALE;
float acc_z_f = (float) acc_z * ACC_SCALE;

	// Store data in input vector
float dataIn[3] = {acc_x_f, acc_y_f, acc_z_f};

	// Enqueue the input data in the AI model buffer
int enq_res = IMAI_FED_enqueue(dataIn);

// Run the input data through the AI model and store
// results in output data vector
int deq_res = IMAI_FED_dequeue(dataOut);

	// Print to serial terminal when a fall is detected
if (dataOut[1] > 0)
printf(“Fall Detected!\r\n”);  // Fall Detected
…
}
Figure 3: code sample for running the fall detection model on a general board
-
Wear the board on your wrist making sure to have the right IMU sensor orientation, refer to Figure-4,5,6
To set up the IMU orientation correctly, make sure the accelerometer X, Y, Z axis and values are as shown in the figures below:
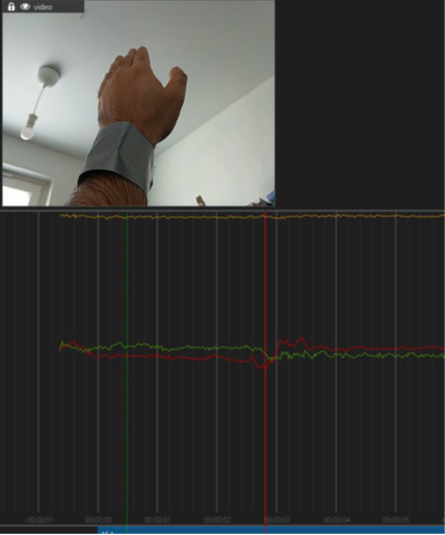
Figure 4: Y = 1, X, Z = 0 --- hand held up
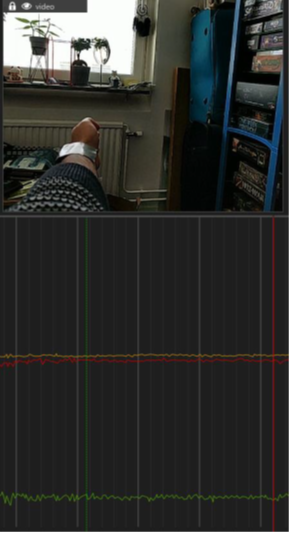
Figure 5: X = -1, Y, Z = 0 --- hand outstretched, palm facing front
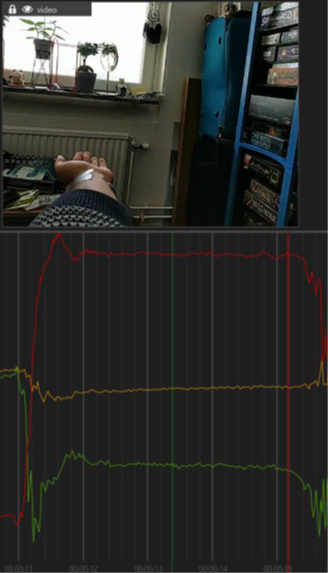
Figure 6: Z = 1, X, Y = 0 --- hand outstretched, palm up
When testing the fall detection model, it is important to test realistically so the person should fall naturally, it is fine if they move their hands or try to brace themselves. Also, when testing the fall detection, it is important to use proper protection and to take safety precautions. Falling one or two times is fine but repeated falling may lead to injury.
Testing the Gesture Detection
To test the gesture detection model on a general board, follow the steps above with the following in mind:
- Configure your radar with the configuration as shown below:
#define XENSIV_BGT60TRXX_CONF_DEVICE (XENSIV_DEVICE_BGT60TR13C)
#define XENSIV_BGT60TRXX_CONF_START_FREQ_HZ (58500000000)
#define XENSIV_BGT60TRXX_CONF_END_FREQ_HZ (62500000000)
#define XENSIV_BGT60TRXX_CONF_NUM_SAMPLES_PER_CHIRP (64)
#define XENSIV_BGT60TRXX_CONF_NUM_CHIRPS_PER_FRAME (32)
#define XENSIV_BGT60TRXX_CONF_NUM_RX_ANTENNAS (3)
#define XENSIV_BGT60TRXX_CONF_NUM_TX_ANTENNAS (1)
#define XENSIV_BGT60TRXX_CONF_SAMPLE_RATE (2000000)
#define XENSIV_BGT60TRXX_CONF_CHIRP_REPETITION_TIME_S (0.000299787)
#define XENSIV_BGT60TRXX_CONF_FRAME_REPETITION_TIME_S (0.0300446)
Refer to the following code example for more details: mtb-example-ml-deepcraft-deploy-ready-model (opens in a new tab). The code segment is extracted from the following source file: https://github.com/Infineon/mtb-example-ml-deepcraft-deploy-ready-model/blob/master/source/radar/radar_settings.h (opens in a new tab)
- Ensure that the right features are extracted from the radar data as shown below:
float model_in[IMAI_DATA_IN_COUNT];
uint16_t min_range_bin = 3;
slim_algo_output res;
slim_algo(&res, gesture_frame, &f_cfg, min_range_bin, &work_arrays);
model_in[0] = ((float)res.detection.range_bin - norm_mean[0]) / norm_scale[0];
model_in[1] = ((float)res.detection.doppler_bin - norm_mean[1]) / norm_scale[1];
model_in[2] = ((float)res.detection.azimuth - norm_mean[2]) / norm_scale[2];
model_in[3] = ((float)res.detection.elevation - norm_mean[3]) / norm_scale[3];
model_in[4] = ((float)res.detection.value - norm_mean[4]) / norm_scale[4];
Refer to the following code example for more details: mtb-example-ml-deepcraft-deploy-ready-model (opens in a new tab). The code segment is extracted from the following source file: https://github.com/Infineon/mtb-example-ml-deepcraft-deploy-ready-model/blob/master/source/radar.c (opens in a new tab)
- Ensure the radar is oriented correctly as shown in the image below:
When testing the gesture model, it is important to have the radar mounted or placed somewhere so that it is not moving when the test is being performed. For best performance you should ideally be in front of the radar, but we have also tested performing the gestures at an angle and the performance is uncompromised. Whilst you should not perform the gestures too quickly, you can perform the gestures at a natural speed and the model will catch it.